Antenna tuners are a vital, yet slightly misunderstood ham radio station accessory. In this video we talk about what an antenna tuner does and doesn’t do, how it works, and how to tune your antenna system with a manual antenna tuner.
MFJ-949E Manual Antenna Tuner: https://amzn.to/3980MW4
Rigexpert Stick 230 antenna analyzer: https://amzn.to/31eaUbx
Antenna tuners, also called transmatches, match boxes, tuning units, or antenna couplers are devices that match the impedance from an antenna system to your transceiver. Amateur radio transceivers expect a 50 ohm impedance from the antenna, but not all antennas will deliver that impedance. That’s where the tuner comes in. A tuner typically consists of an inductor and variable capacitors can be adjusted to create the proper impedance.
Now tuners don’t actually ‘tune’ your antenna. They don’t change the physical characteristics or make the antenna better. Instead they just provide the proper impedance match to the transceiver, so the transceiver can operate in a more efficient manner.
So why do I need one? Basically a tuner gives you more range and utility from your antenna. Many multiband antenna designs will require a tuner for full operation. Non resonant antennas also require a tuner. Even if you use a dipole antenna, a tuner can be used to increase the bandwidth of your antenna. For example, if your dipole is resonant on the low end of the band, a tuner will allow you to work it in the upper end of the band. This becomes necessary in the lower bands like 40 and 80 meters as antenna bandwidth typically narrows as you get lower and lower in frequency.
But what if your transceiver already comes with a built in tuner. Do I still need an external one? I say the answer is yes. I believe an external tuner is an essential station accessory, even if you don’t need it all the time. Many transceivers do have built in tuning units, but these are mostly convenience items as they will only tune to about a 3:1 match. That means if your antenna’s impedance at the feedpoint is 150 ohms or is presenting a 3:1 SWR the tuner will be able to compensate for a 50 ohm impedance at the transceiver, That’s ok if you wish to extend the bandwidth of your dipole or say use it with a multiband antenna like an off center dipole or end fed half wave antenna. But if you get into the lower bands or use a non resonant antenna like a G5RV or anything fed with ladder line, then an external tuner will be necessary as these units can give you matches of 10:1 or more.
A lot of hams will gravitate to external automatic tuners, and they are nice- I use a couple myself. But nothing beats the simplicity and utility of a good ole manual tuner. Manual tuners often will work at higher power levels or offer an even greater range of impedance match than an automatic model. They are also cheaper than many auto units, especially if you find a used one at a hamfest. Plus once you set it up, you may even be able to do band changes faster than an automatic tuner.
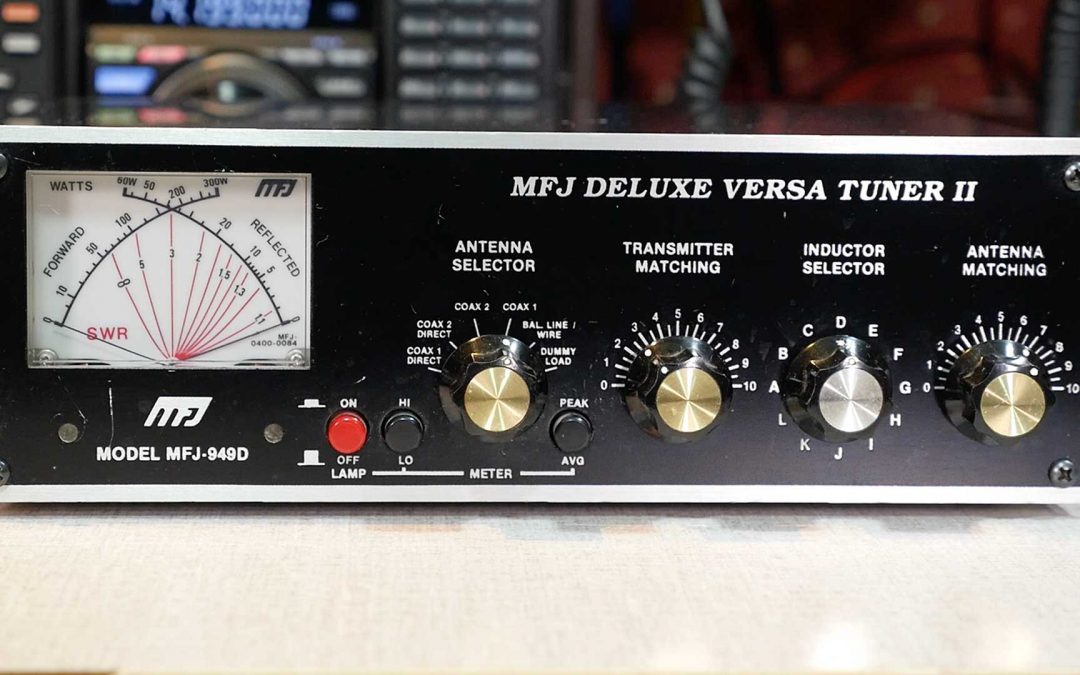
But what’s inside a manual tuner. On my bench I have an MFJ 949D manual tuner. The 949 series is a very popular and long running tuner that is still available as the 949E. I bought this one used maybe 20 years ago, but really nothing’s changed much between then and now. Looking at the outside from left to right we have the meter, and this has a cross needle meter that displays forward and reflected power simultaneously. You measure the SWR by looking on the graph where the needles cross. Next you have a selector switch to choose between two different antennas, antenna bypass, open feed line, and a dummy load. So not only will this unit work as a tuner, but also an antenna switch, dummy load, and a 4:1 balun for ladder line.
Next are the tuning dials. The 949 series is a T network tuner and is capable of matching a wide impedance range. It has three dials, two for capacitance and one for inductance. You have the ability to adjust capacitance on either side of the inductor. And basically that’s how tuners work, all they do is add an amount of inductance and capacitance to your antenna system to bring the feed point impedance down to 50 ohms.
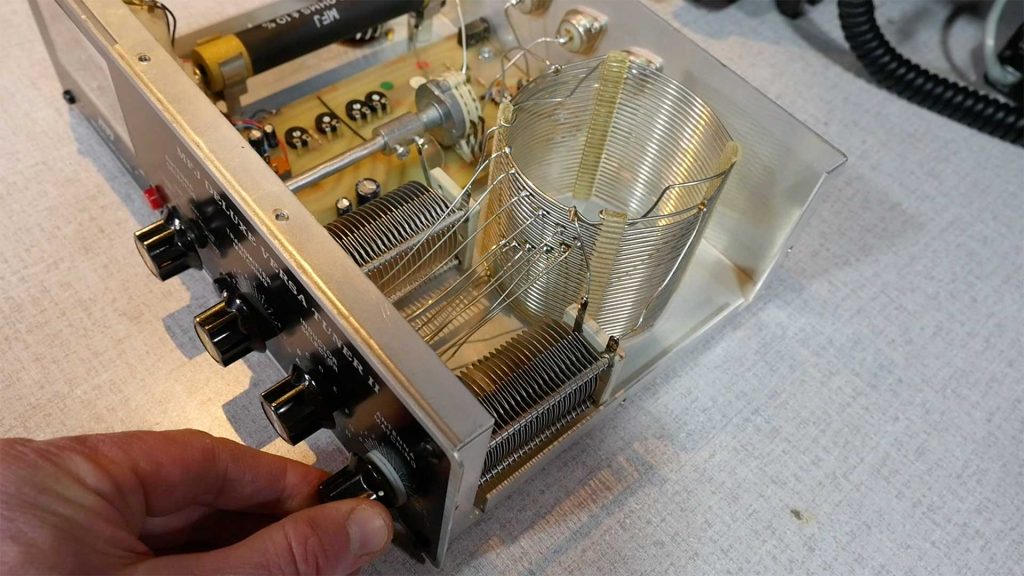
Opening up the tuner you’ll see what I mean. To the left is the dummy load, but if you look on the right side of the tuner you see a big air wound coil that is tapped in several spots. This is the inductor, and each tap corresponds to setting on the inductor dial. The inductor sits between two air gap capacitors. One for the transmitter side and another for the antenna side of the inductor. As I turn the dials, the capacitors mesh, with the least amount of capacitance as the zero setting and the highest level of capacitance at the 10 setting. So by looking at how these dials operate, you can get an idea of how the tuner does its magic to adjust the antenna’s impedance. So let’s close this up, hook it up to the transceiver and do some tuning.
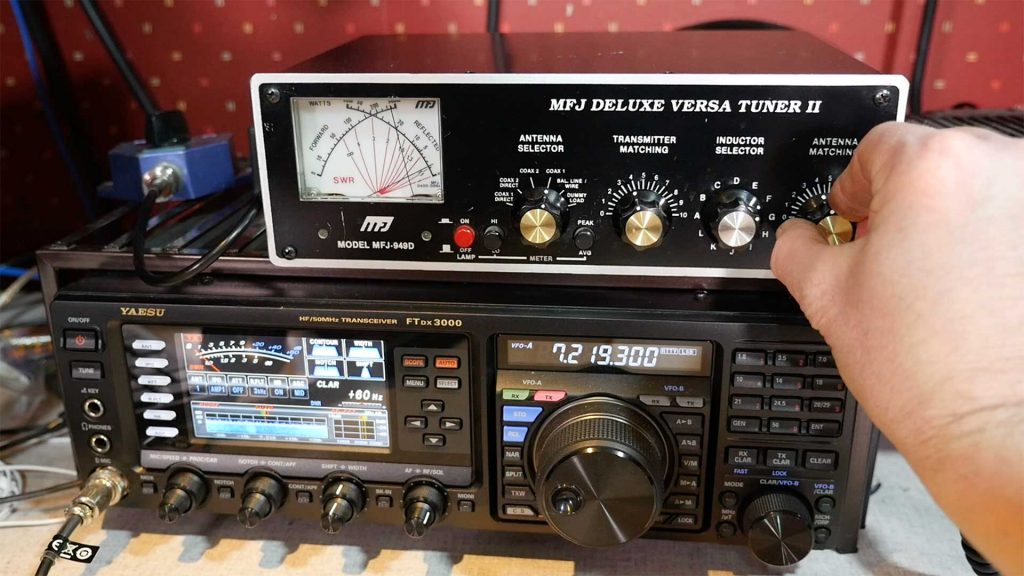
I’ve got the tuner connected to my transceiver and the antenna I’ll be using is a G5RV. This is a non resonant antenna that requires an external tuner for effective operation. So this is a great demonstration of the tuner’s ability. The steps in using a manual tuner are as follows: First select your frequency. Find something that is close to your operating frequency, but don’t tune up near or on a frequency where someone is operating- that’s bad form. Next turn your transmit power down to its lowest setting- this will protect the transceiver and help limit interference. Then set your transmitter into a constant carrier mode like CW, AM or RTTY. I usually set mine to the data mode as I can then use the microphone to key the radio. Next turn the inductor dial until you hear the loudest noise. This may be a bit subjective, but you’ll get the idea of what setting is the loudest. Never turn the inductor while transmitting. Now start transmitting and watch the needles move as you begin adjusting the transmitter and antenna dials.You will want your forward power at its highest deflection and the reflected needle at its lowest. I usually start with the transmitter side to get it low, then move to the antenna to bring it down more. I may then finish tweaking on the transmitter and antenna dials a third time. And that’s it. Once the SWR is at its lowest, your antenna is tuned for your transceiver. After you’ve tuned, you can increase your transmit power and give it a final tweak. Write the values down in your station log so you can expedite things when you return to that band. Repeat this process for each band and frequency you wish to work on and you’ll soon have a list of tuning spots for super easy operation.
A couple of things to note, on some bands or frequencies, you may not be able to get the SWR down to a perfect 1:1. Depending on the style of antenna you’re using that’s normal, and perfectly ok. As long as you are reasonably below 1.5:1, the transceiver won’t mind.
Also, I mentioned the transmitter and antenna dials add capacitance to the antenna. The higher level of capacitance you can give, the more efficient your tune will be. So higher numbers on those dials are better than lower ones in your overall antenna efficiency.
Finally, antenna characteristics will change with time and the environment. Depending on the time or year or the weather, your tune may change, so periodic adjustment may be necessary. That’s why we write data down in our station log so we have a reference point for future adjustment.
As a bonus, if you have an antenna analyzer, you can use that for your reference signal and bypass the transceiver. The process is exactly the same as tuning with the transceiver. The analyzer will give you accurate SWR readings so you can fiddle all you want with your tuner without fear of creating interference or harming the finals in your transceiver.
With a little bit of practice you’ll be a manual tuner pro in no time. You’ll learn a bit of impedance matching and see how it is an important part of antenna function. Plus isn’t it more fun to twiddle dials than to listen to the clicks and whirs of that autotuner? Do you have questions or comments about using a manual antenna tuner? Please leave it in the comments below. I’ll filter through the comments and follow up with them. Who knows, you may end up on my next Your Questions Answered livestream.
Recent Comments