
The memory bank feature of the Yaesu FT2DR/FT3DR handheld radio is a powerful method to organize your channels. In this video I take you through the steps of setting up the memory banks in your radio.
Viewer Swede Bloodfist asks the following question:
Thanks for this video and your blog about setting up APRS. I have a request: Would you make a video explaining how to set-up FT3DR memory banks. I understand the concept, but following the steps in the FT3DR Advance Manual is confusing.
That’s a great question and in this video we’ll dive into this powerful feature that’s found on the Yaesu FT3DR handheld radio. First a little background information. The Yaesu FT3DR has 900 memory channels and these 900 channels can be organized into 24 banks with up to 100 channels per bank. A channel can reside in multiple banks which is really handy as you can set up banks for your local channels‚ simplex channels‚ and regional channels. You can also combine channels into banks that maybe just have fusion repeaters or a mix of repeater and simplex channels for a particular public service event.
 For example‚ in a recent event I participated in‚ I created a bank that pulled together the repeaters we’d be using in addition to the common simplex channels. Then at the event I could switch to the bank and the channels I needed were easy to access.
Please note: I’ll be demonstrating this feature on the FT3DR but the bank function is identical on the FT2DR‚ so if you have that handheld‚ you can also take advantage of this powerful feature. So how to you set up the banks?
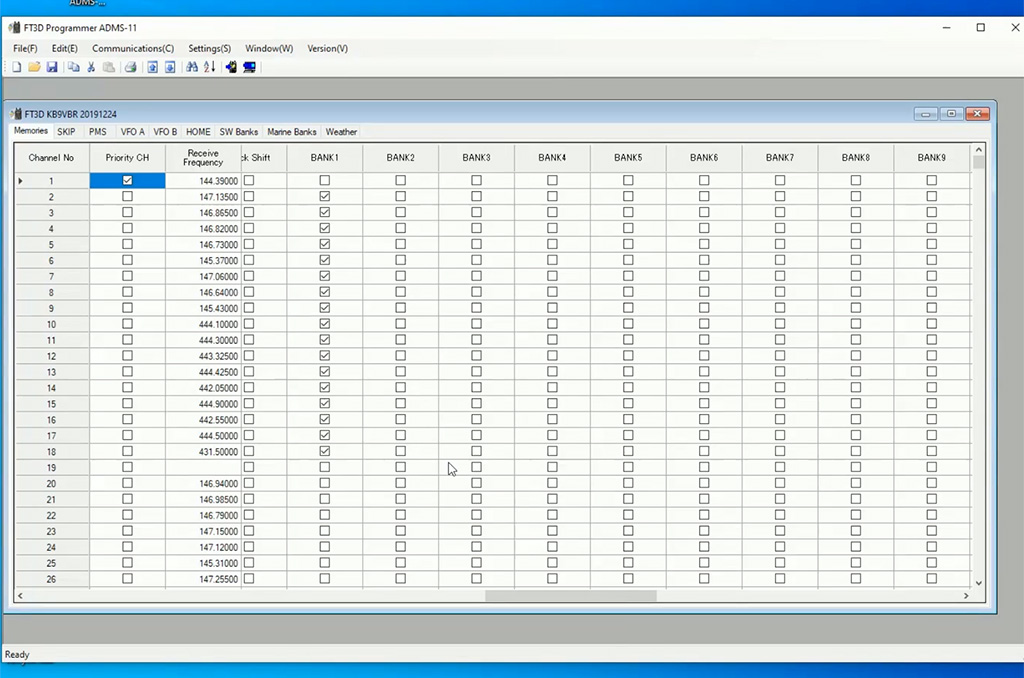
First I’ll snow you the easy method by using the ADMS-11 programming application that Yaesu provides. ADMS-11 is available for free from the Yaesu website. You can program the radio using the optional programming cable or by reading and writing the program to the Micro SD card.
To set up the banks with the software- first write your memories to the SD card and import that into the computer. In the spreadsheet display seen on the screen scroll to the right and you will see several columns marked bank 1 through 24. In these columns you can put little checkmarks to indicate what channels you wish for each bank. Like I mentioned you can put the same channel in multiple banks so feel free to organize the banks however you desire.
 To make the organization process easier‚ you can also name the banks just like you name channels. To do that‚ Go under the settings menu and select settings. From there click on the memory tab and you’ll see a list of the 24 banks. There you can give your banks descriptive names to make choosing them on the radio easier. Next to the bank name is a check box for bank link. You can link two or more banks together so when you scan the banks‚ the scan feature will scan both banks. For example- say I want to scan both my local and simplex banks. I could check both those banks. They will be joined together but the channels will still reside in their respective banks.
After you are done setting banks you can write the data back to your SD card and read it back into the radio.
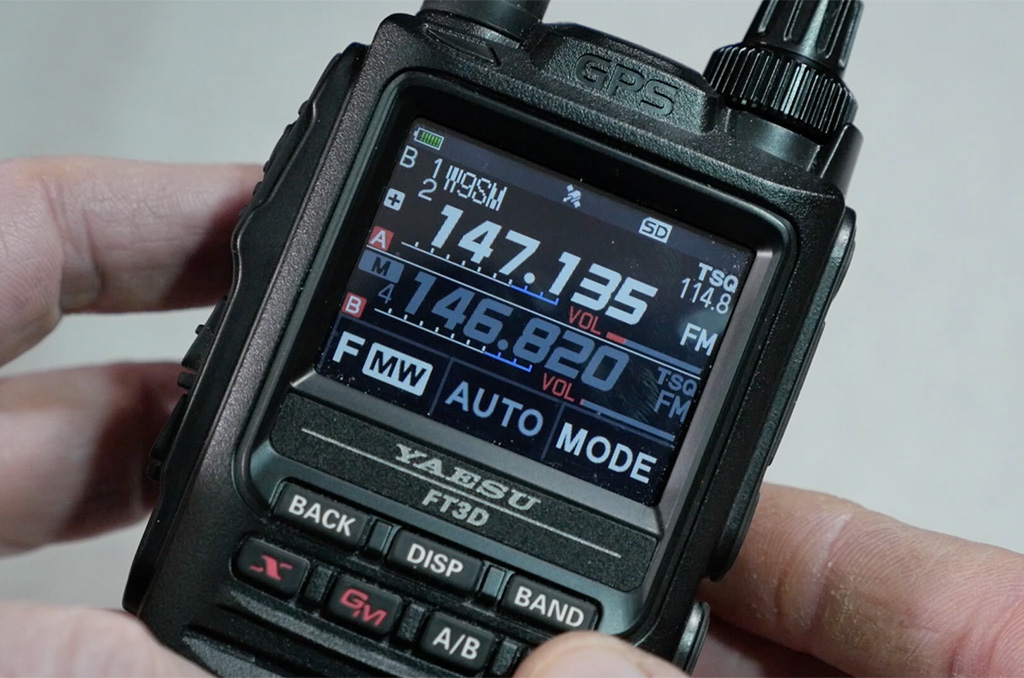
To use the banks feature‚ first make sure you are in the memory mode- there is a little M in the upper right of the screen. From there to active the banks‚ press the F button and then press the Bank button that appears on the screen. If you don’t see the Bank button you may need to press Back to get to the first page. You’ll now see a B in the upper left of the display and you will be taken to the first memory bank. To change to another bank‚ press the Band button and rotate the selector dial. You’ll see your bank names cycle through the display as you rotate the knob. Pick a bank and press either the back or the band button to activate the bank.
You can use the banks feature on both the A and the B band so you can work separate banks on each band or maybe banks on one band and memory channels or VFO on the other.
If you are in the banks mode and wish to go back to memory mode so you can scroll through all the channels- you accomplish that by pressing the F button and then selecting the MR button on the display. If you don’t see the MR button on the display then press the Back button to get to the first page of the function settings.
 Say you wish to add a channel to a bank on the fly or you don’t want to use the programming software to set up your banks. Adding and removing channels from the banks is straightforward process. First to add a channel to a bank‚ make sure you are in the memory mode by pressing the F button and selecting MR on the screen. You’ll see the M in the upper left of the display. Rotate the selector knob to pick a channel. Now press and hold the F button to activate the memory write action. You’ll see a blinking channel number as the radio is waiting for you to write the information to a channel. Rotate the selector dial to the left until you see the bank numbers or names. Select a bank and then press M Write to add the channel to the bank.
To remove a channel from a bank‚ first go to the memory bank that contains the channel and then touch and hold the F button until the memory options appear. Press the button with the six squares and then press M Del. This will remove the channel from the memory bank but it won’t delete the memory location.
 Finally‚ to name a memory bank. Memory banks can be named using up to 16 characters. To add or change the name of a memory bank- press and hold the Display button until the radio settings menu appears. Press the memory button in the upper right of the display and select the option number 2 which is titled Bank Name. Here you can use the key buttons on display to type in a name for the memory bank. When you are done‚ press the PTT switch to save the characters and return to normal operation.
If you wish to link the banks‚ from the same memory menu that the memory bank name is located‚ go to option 1 Bank Link. You can press on the display to link the banks or use the selector dial and the display button to link banks together. As I stated earlier‚ linking banks is helpful if you wish to scan through multiple banks of channels on the radio.
So How do I use the memory bank feature? Much like a conventional radio scanner‚ the bank feature allows you to easily create scan lists for your favorite amateur and public safety frequencies. If I’m going to take part in an event where our group will provide health and welfare traffic‚ I’ll put the channels we will use into a bank for easy access. I also keep my local channels‚ simplex channels‚ and out of area channels in separate banks. Since banks can be created on the fly in the radio‚ it’s easy to organize your channels in the FT3Dr in such a way that makes them easier to access no matter if you are monitoring the local repeaters at home or traveling to an area outside of where you normally listen.
Do you have any questions about using the memory band feature on the Yaesu FT3DR? Please leave them in the comments below, i’ll follow up on the conversation and may even pull out a few for my next Your Questions Answered video.

Recent Comments